
So, remember last week’s H54F, when I showed a pic of the Mercy Wreath I made for my MIL? Well here’s the tutorial I promised!
What you’ll need:
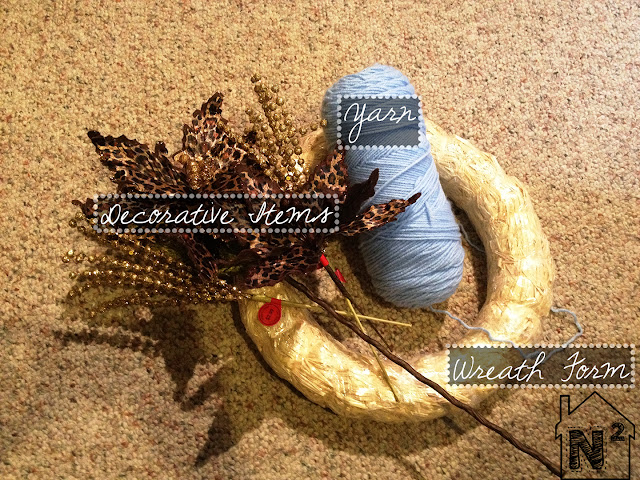 |
| Not Pictured: Glue Gun & Glue Sticks |
*I love these straw forms because they’re a good size and
super cheap. I usually can get them at Joann’s for less than $2.00 each,
usually closer to $1.00 since I have the Joann’s app that always has coupons
for 20-50% off my purchase. I’ve used the Styrofoam forms before but they were
more expensive for the size I liked, the Styrofoam smells bad and melts under
my glue gun, and if the wind knocks them off your door hanger they can shatter!
*I just grab whatever’s cheapest. You can usually fine the
Red Heart Super Saver yarn in every color and on sale at either Joann’s or
Hobby Lobby for less than $3.00. One package will cover the whole wreath form
and leave enough left over to either do another wreath or even make a scarf!
*These leopard print Poinsettias were 40% off at Hobby
Lobby. Add a few gold accent sprays and I was instantly inspired to make a
Mercy themed craft with them.
Making your wreath:
Decide which side of your wreath will be your front and
which will be your back. (If you’re using the straw form I used, be sure to
leave the plastic ON! I don’t like
risking tearing the plastic so I also don’t take off the sticker tag, which
means that, for me, the side that has the sticker on it is my back.) Start by
adding a dab of glue to the back of your wreath and attaching one end of the
yarn ball. (I usually start on the sticker.) Then simply wrap your yarn around the
form adding a dab of glue on the back of it every few inches to help the yarn
stick in place. Make sure you push the yarn tightly together with each pass so
that none of the wreath form shows through. This is a somewhat tedious process,
but if you sit down in front of a move and just work while you watch you’ll
probably get done around the time the movie is over.

Once you’ve made it all the way around you can always do a
second quick pass to add depth and texture.

Now figure out where you want your decorative items to go.
With the straw forms you can sometimes have an area that was over or under
stuffed so you end up with a wonky area. That’s usually where I decide to put
the decorative items since they’ll cover up the flaw. Remove the excess stems
from your flowers and sprays, or, if they’re really thick and hard to cut,
tightly roll them up so that they can be tucked under the flower itself. Play with
how you want them to lay. Once you get it the way you want it simply hot glue everything
directly onto the wreath. The nice part about items from the fake flower
section is that they’re usually made with wire so you can mold and play with
them to get them just right even after you’ve already glued them on.

Finally, determine where the top of your wreath is and add a
hanger to the back of it. I just tuck some more yarn folded in fourths and
attached it with a big dab of hot glue.

Hang up and admire your new wreath, which probably cost less
than $10.00-$15.00 to make, depending on how expensive and how many decorative
items you put on it.

And last but not least… High Five for Fridays!!!


- My daddy’s coming in to visit this weekend!
- We went to the premier of Looper! (I liked it, but the jury’s still out on Blake’s opinion)
- We had a good day down at NuLu Festival watching all the little kids dance to the Jake Parker Band! (It was funny because you would have thought we were at a kids concert they loved them so much but they do mostly Rock n’ Roll. Our friend Jake is the lead singer)
- I gave my blog a new look and posted twice this week!
- It feels like fall! (I potted some mums and finally potted all the plants that were sitting on my porch)

Wow!!! That wreath is amazing, and I really want to try making it...I'm bookmarking your blog so I can come back to it. Gorgeous!
ReplyDeleteI'm excited to watch "Looper." I'm pretty much a sucker for anything involving time travel!
I found you through High 5 for Friday, and I'd love for you to stop by my blog and say hello!
Cindy at Notes in the Key of Life
I'm giving away a gorgeous Soft Surroundings top!
Thank you Cindy! It's so nice to get feed back from a fellow, and more experienced, blogger. I popped over to your blog, and it's adorable. I very much look forward to reading more of it.
Delete